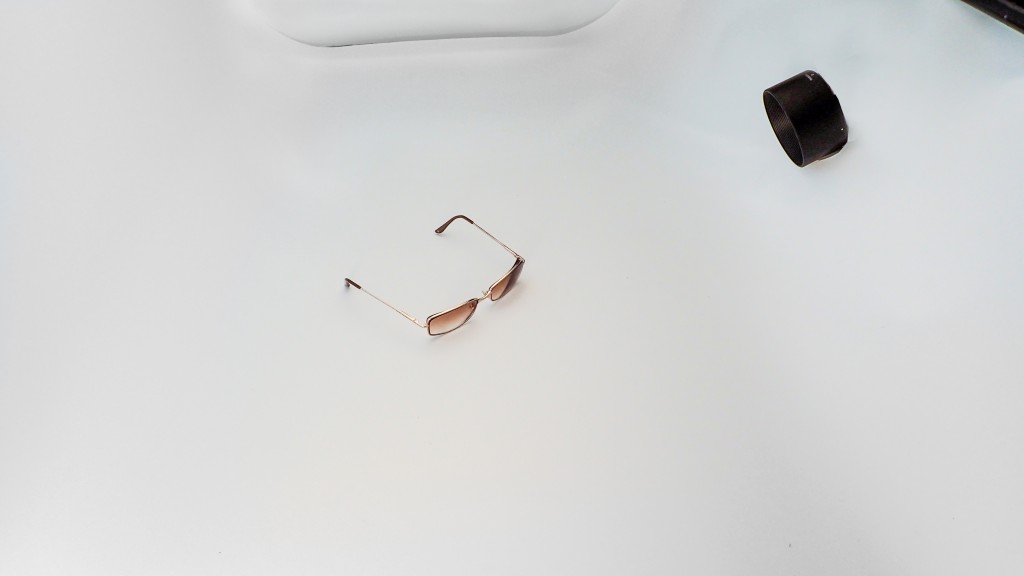
For those of you who sell highly reflective products, such as sunglasses, you might find this article pretty useful. We know that you are just like every other e-commerce business out there. You want to have attractive images of your products that enhance your sales. Shiny or reflective objects are some of the most difficult items to photograph. We won’t lie to you this is going to stretch your photography skills to their limits. But the good news is once you figure out the process it will get a lot easier.
The first reality you need to grasp is that in order to photograph highly reflective products properly, you’re going to need a lot of equipment. You are going to need to spend some money. But it’s worth it. You are making an investment in your business. Try to remember that these expenses will enhance your business and increase profitability.We are going to focus on sunglasses but a lot of the tips we mention can be used to help you photograph lots of other reflective items. Please keep reading and remember you can use these tips for products like jewelry too.
Once you finish capturing your photographs, consider sending the RAW files to Picsera and we’ll take care of the editing for you. You deserve the break after all your hard work. Ready to learn how to shoot reflective products like a pro? Continue reading below.
Goals in Shooting Reflective Products
When photographing sunglasses there are several objectives you want to focus on. When shooting sunglasses you goal is to…
- Create controlled reflections in the lenses – you don’t want to see yourself or the camera in the reflection
- Have even lighting with soft shadows – this type of light will make your sunglasses look appealing to the buyer. Harsh shadows can detract from your product.
- Ensure crisp edges and logos – sunglasses are hard-edged make sure your images are crisp. You also want the logos to be highly visible. Many people purchase their sunglasses based on the brand so this is really important.
- Photograph the correct color rendering – The last you thing you want is for a client to order sunglasses expecting one color and receive another. Make sure there are no surprises for the buyer.
These goals may seem daunting but it is possible to create images that contain all these attributes. It may seem like a lot but it’s going to pay off in the long run.
Let’s Talk About Photography Equipment
This is one of those times when purchasing cheap alternatives will not work. You need to have the proper equipment to get great results. So with this in mind let’s talk about all of the items you need to purchase.
Camera Gear
A DSLR and a macro lens are a must for this project. You cannot capture the type of sharp and highly detailed images you are going to need with a cheap point and shoot camera or with an iPhone. Bite the bullet and purchase a higher grade camera. Remember it’s an investment, not an expense.
The macro lens you purchase should be in the range of 55 to 105mm. Alternatively, you can purchase a cheaper kit lens and utilize an extension tube for this project. Be sure buy a higher quality set of tubes that will allow you to use autofocus. Manually focusing can take quite a while and you don’t need that challenge on top of setting up your lighting and studio.
For more information on macro lenses and extension tubes, you can check out this link or this link.
Studio Equipment
Lighting
Just like any other genre of photography good lighting is the key to capturing great images. You can spend the money and purchase a strobe light or choose to purchase continuous lights. Take a look at this kit or this other kit- any of these would be suitable for your needs.
Stands
In addition to these lights, you will need stands. One stand should come with a boom arm so you can position your light appropriately. The other light stand can be a basic model without the large reach of the boom.
Softbox
A softbox is also essential. Softboxes are probably the cheapest item you will need to purchase. Try to find one that is at least 32”. Check out this link for ideas …
Background Materials
You have to be picky about the materials you use for shooting sunglasses. The key is to find material that won’t reflect in the lenses of your glasses. It’s those unsightly reflections that will distract from your product. We recommend a PVC or Vinyl background like Savage Translum, 54” x 18’. Translum is texture free so you won’t see any patterns reflected in the lenses. It’s fairly easy to attain and won’t break the bank which is a bonus.
We should mention, however, that Translum does have a drawback. If you choose to use Translum you will need to use a white paper liner to prevent edge detail from showing in your photos. You don’t want to have lines reflecting in the lenses. Alternatively, you can use a heavy weight white paper backdrop but be aware that the texture of the paper will reflect in your lenses. Experiment with both options and choose the one you like best.
Miscellaneous
You will also need the following to finish the setup. These are items you probably have sitting around the house or business so they shouldn’t be too stressful to attain.
- “A” Clamps Need 6-8 clamps
- Large 4-foot long work surface (folding tables work well)
- Camera Tripod
- 2 Background stands with one cross bar per stand
- Pen, scissors and transparent tape
We know that all this gear seems like a lot of equipment. Given the long list of specialized equipment, it might be easy to try and use cheap substitutes but these items are essential for creating great images. When fully edited your pictures will give customers an accurate representation of your product. We all know how important this factor is in e-commerce. So take the time to photograph your sunglasses properly.
If this wasn’t enough encouragement remember you are completing the easy part of this process. The editing and retouching of your images will take up the majority of your time. We can help with this part of the project. Set up your studio, capture your shots and let us do all of the time-consuming detail work in Photoshop.
How to Set Up the Studio
Now that you’ve gathered all the necessary equipment it’s time to use our tips to set up your photo studio. This isn’t a quick set up. Once this legwork is completed it’s easy to place your sunglasses in the set, snap a few shots and then move on to the next pair. So bear with us as we describe the ideal studio set- up for shooting sunglasses and other reflective objects.
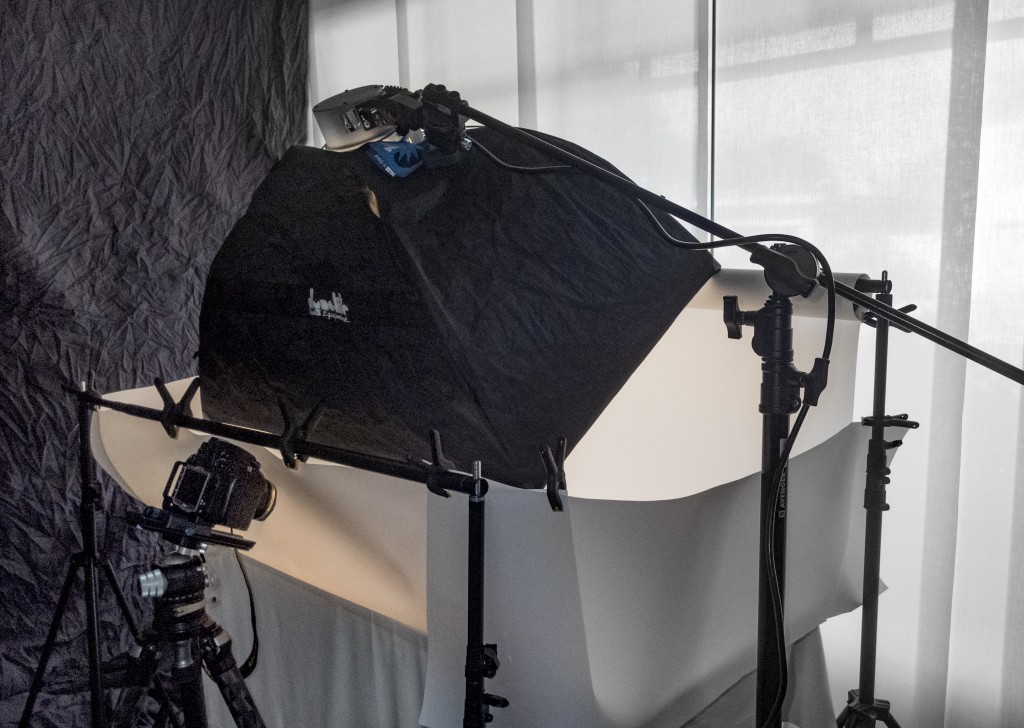
Illustration of Studio Setup: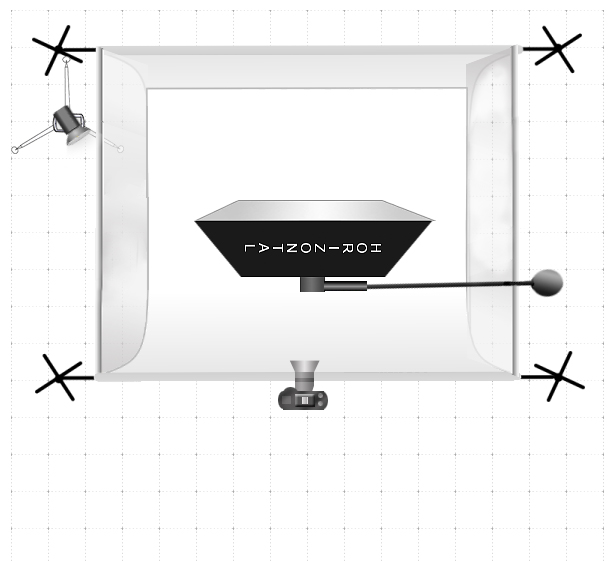
Steps to Set Up Your Photography Studio
Step 1 – Start with a solid base – find yourself a sturdy work surface. A folding table works quite nicely.
Step 2 – Drape a large white optical white sheet over the table or use a white background paper. You don’t want the color of your work surface to reflect off of the Translum background. This will affect the color representation of your sunglasses
Step 3 – Behind the table you will set up background stands. They need to be positioned so that the top of your stands sits high enough to block out any possible reflections.
Step 4 – Unroll the Translum material. The height should reach 12” to 18” above the height of your table. You will need to unroll and cut out 2 strips of the material. The length should be 18 inches. Then use the clamps to secure the material in place behind your table.
Step 5 – Place another background stand at the front of your table.
Step 6 – Now set up your camera just slightly behind the background stand located at the front of your table. Adjust the height of your camera so that the workspace is in view. You will use the viewfinder to help you position the rest of the setup. Adjust the height of your background stand so it is about 8” above your camera lens. All of these steps are about creating a space that is well lit but free from items that might reflect on the lenses.
Step 7 – Next, you will unroll the Translum so it covers the table and then arches upwards to the top of the background stand, located in front of your camera. The Translum will almost look like you are creating a “U” shaped” valley. The important thing is to block out any possibility of the camera equipment reflecting in the glasses.
Step 8 – Mark the position of the camera on the Translum and cut a hole for the camera lens. You don’t want to make it too large. The hole should fit snugly around your lens but still allow you to adjust the focus ring.
Step 9 – Take more strips of Translum that you cut earlier and use transparent tape to attach them to the open sides of your U-Shaped “valley” of Translum. The goal is to wrap the edge of your background around to the front of your studio to prevent reflections entering the set-up from the sides.
How to Set Up the Lighting
It’s possible to effectively shoot these images using just one light. The photos will be bright, crisp and show great detail. So if your budget only allows for one light don’t stress too much. Do what you can with the resources you can afford. If you have the budget to purchase two lights go for it! The second light can be used to create some edge detail or a nice highlight.
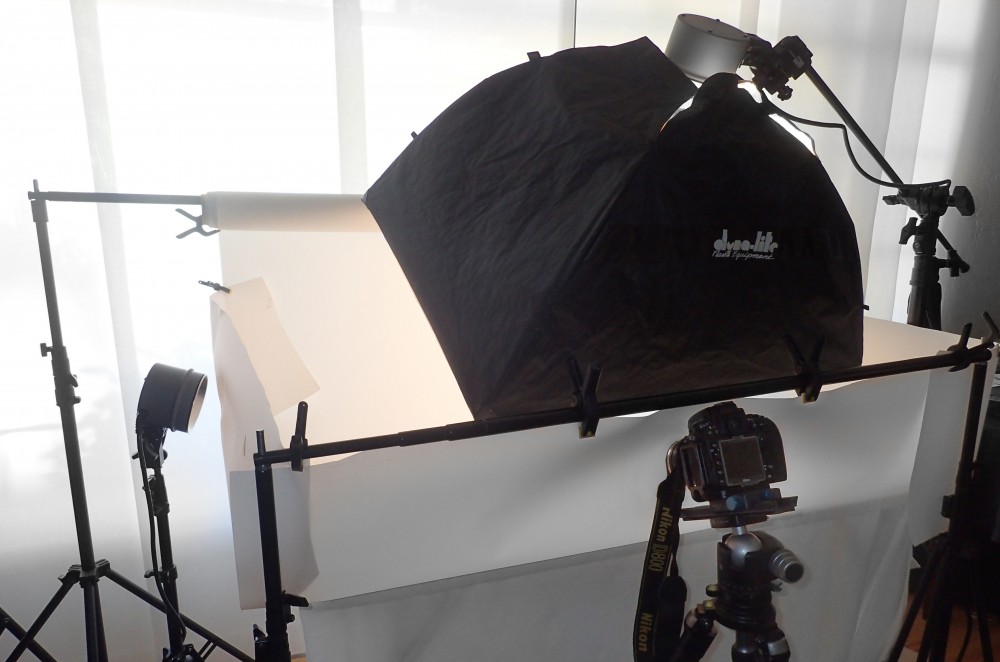
Arranging the Boom Stand
You’re now entering the final stretch. Attach one light and softbox to the end of the boom. Weigh down the base of your boom stand so it’s secure. The last thing you want is for the boom to fall over when you begin to adjust and position your light.
Next, you need to position the light so it hangs over the top of your table and between the background stands. Angle the light slightly towards the back of your set up so that the light doesn’t flare in your camera lens.
Take a few test shots and see how everything looks. If you are happy with the results you are now ready to start shooting all of your products. We suspect that you will need to slightly adjust your light and the Translum. There’s nothing wrong with fine tuning your shooting set-up, the results will make it all worthwhile.
When you are shooting your test shots check out how the sweeping “u” shaped Translum creates a nice highlight in the lenses. This type of highlight won’t detract from the look of your product. If you wish to add the second light be sure to position it at the back of your set up behind the Translum background. The light will shine gently through the back and create some nice details and highlights.
Challenge Completed!
You did it!!! Give yourself a pat on the back. You’ve learned a new skill and probably attained a better understanding of all the hard work that professional photographers put into their jobs. You’ve got your set-up and you’ve tested the arrangement with a few shots. It’s now time to start shooting all of your products. The time you spent setting up will now pay off as you arrange and take a few quick photos of each of your products. In a morning you will easily be able to capture images of 20 or more products- No coffee needed.
We know the “setup” seems tedious but it’s really just a little bit of short term pain for long term gain. Those images you worked so hard to capture can now be uploaded for editing. If you are like many others in the E-commerce realm you need to focus on filling orders and managing your site- Contact Picsera to save time (we don’t mind sitting in front of a computer). Let us polish your images for you. We’ve got lots of great post-production packages to suit your needs.